Thursday, June 30, 2011

The Pseudo-Random Quilt Block Distribution Problem

After cutting up my 10 colors of Quilter's Tweed (very carefully, with no room for error, in order to get the most out of the fabric), I found myself with a problem that I've encountered more than once in my not-so-terribly-long quilting career. Since it's such an interesting fabric, I'm going with a very simple quilt design--rectangular blocks sewn in columns, half-offset. I don't want to go with a constantly repeating order of colors; rather I want them randomly scattered across the quilt.

Except, of course, I don't really want a random pattern.

I first encountered this problem a couple of years ago with my best-friend-from-high-school's wedding quilt:

I can't believe I didn't take better pictures of it.

It's a double wedding ring that I put together from a quilt kit I bought, because I wasn't confident enough to try cutting all those teeny curved pieces myself. If you look closely in this picture, you can see that the fabrics in the kit were, in more than one instance, the same fabric but in a different color.


I wanted the 24 fabrics in the pieced arcs to be random--except, of course, I didn't ever want the same fabric next to itself, and while the same pattern but different colors next to each other was OK, I didn't want that to happen too often. And I didn't want the one color of fabric to another fabric of a very similar color too often. So it really wasn't random at all, with all those rules, and it became rather difficult.

After I finished the top, I mentioned the problem to a crocheter friend who was, at the time, working on a baby blanket made up of log cabin-patterned granny squares that used four different colors. She realized she was going to face the same problem when she was ready to put them together, and we started talking about the fact that there really ought to be a computer program that could tell you what block you should put where.

Unfortunately, once you start thinking about how to codify the rules, you realize that this is actually a much more difficult problem than it at first appears. Things like "these fabrics should sometimes but not often be next to each other" and patterns like a double wedding ring which doesn't fit nicely into a computer grid are actually really hard to deal with. Nevertheless, since my friend is a much better computer programmer than I am, she managed to write a simple program that can handle a rectangular grid and minimum separation distances. (At the moment, it's not stand-alone software, so unfortunately if I were to share it with you at this point you'd still need the programming language software. Someday, though...)

At the moment, you set up a grid of allowable distances between each different block (in this case, color of Quilter's Tweed) and tell the program how many of each block you have.


You give it the size of the quilt grid into which to put the blocks, and the program goes through the grid methodically, selecting a random block and then checking to see whether or not it meets the distance requirements. If not, it selects a different one; if it can't find one that will fit, it starts backtracking.

As you might imagine, this ends up being rather, as they say in the programming world, "computationally intensive." For my Quilter's Tweed quilt, I said that at least one other block had to separate the same color. With 10 colors, the program managed to spit out a grid in a minute or so. Then, I thought I'd change it to two blocks separating identical colors--and after 3 hours, it was still running (at which point I either accidentally quit, or the software crashed). It also took about 3 hours to find a layout for my friend's baby blanket--so we would like to find a way to do this whole thing more efficiently, in addition to adding a bunch of other features that might make it more versatile.

In the meantime, though, I'm going with one of the grids that the program did spit out.

Every other column will be half-offset.

I'm eager to see if the final quilt will show the desired effect!

Sunday, June 26, 2011

Where to put a design wall?

In the next few months, I'm going to be moving into my fiancĂ©'s house--which means that I get to redesign a sewing/craft/office room from scratch. I'm super-excited, and have been scoping out storage options at IKEA and reading up on organization ideas in a neat book I bought. The only problem is that it's a long, narrow room, and both the long sides have a sloped roof, which limits my wall storage space and will make it difficult to hang a design wall:

It used to be his "junk room." You can see he is still working on moving the junk. :)


We thought about maybe putting in a partial room divider flush with the closet next to the door--but that won't give me any space to step back from the wall, which is the whole point of it.

Does anyone have any suggestions, about the design wall specifially, or how to deal with sloped walls in general? I'm thinking of painting the top part with magnetic paint, if I can find it, to at least allow me to use that space to some degree.

Sunday Stash Report

Can I just plead the fifth amendment?

I bought a bunch of batiks in preparation for a landscape quilting class I will be taking with Chris Eichner at the end of July.

We will be making a mountain scene, I think.

Also, a while back I picked up two fat quarters of Quilter's Tweed, and yesterday at the quilt shop I found all the other colors so of course I had to complete my collection. Here it is, completed:


There was a neat, simple sample quilt in the shop a while back which I was going to reproduce. It should whip up pretty quickly.

Nothing much to report on the out front--I'm still finishing up phone cases.


Used This Week: 0
Used Year To Date: 22.75
Added This Week: 4.25
Added Year To Date: 68.875
Net Used For 2011: -47.125


See how everyone else is doing...

Monday, June 20, 2011

Drawstring Phone Cases

When I returned from my vacation, my cell phone refused to turn on, so I ended up having to get a new one. I decided it needed a protective case, so I made it a little drawstring bag:


Your phone may differ in size, so I've tried to indicate how to figure out the correct size for yours! All seam allowances are 1/4".


Here, the fabric is folded at the bottom. It's a non-directional fabric, so that worked in this case. I decided that, taking the thickness of the phone into account, it measured about 3x5 inches. I added 3/4 inch at the bottom and an inch on one side for a total measurement of 11 1/2x4 inches.

Cut out and sew up the sides with a 1/4" seam. I used my serger, since it's still pretty new to me and I like getting practice on it. Turn right side out.


Cut two pieces of fabric for the drawstring casings, 3 1/2x1 1/2 inches. If your measurements are different, they should be the width of the finished body of the bag. So, if the body was 4 inches wide, then 1/4 inch for seams on either side, that's 3 1/2. This way the finished casings will be just a little shorter than the width of the bag.


Overedge the sides...

You should probably use a matching thread color for edging the casings,
but I was too lazy to change the thread in the serger. It's a pain.

Also cut a piece of fabric two times the finished width of the bag, plus 1/2 inch for seam allowance--so here, 2 x 3 1/2 + 1/2= 7 1/2 inches. This will be the ruffle at the top. Sew short edges together, right sides together.


Fold in half so the seam is on the inside and the right sides are visible on both the outside and the inside of the tube. The raw edges will be on one side. Press.

Fold the short ends of the casing strips in 1/4, then press in half lengthwise, wrong sides together, as seen in the right of this picture:


Now, for some fancy pinning. You want to pin the ruffle to the outside of the body of the bag, and the casings in between (one on each side) with all the raw edges aligned.


I should have taken another picture, but in this one you can see the white in between the purple layers.


Sew and overlock the raw edges.

Sewing machine was used here. Sergers are not made for sewing tiny things, apparently.

Now, when you flip the ruffle up, it should look like this:


Cut two lengths of ribbon, each about four times as long as the width of the bag--or however long you want them (maybe long enough to go around your wrist once the bag is closed?). Thread each ribbon through both casings, starting at opposite sides as shown below, and knot the ribbon ends together.


You'll notice that the casings can either lie upwards, towards the opening of the bag, or downwards. There should be plenty of room for them to lie downwards, so you have more ruffle showing at the top, but if you find the fit is tight at the top they could also lie upwards, giving you more room for your electronic goodies.

In with you, phone!

After seeing mine, my friend, who recently got a new smartphone, wanted one too.


She has an Android Evo phone--here are the dimensions I used for her bag:

Body: 8 1/2"x7 1/2" (the fabric was directional, so you'd fold the 8 1/2" side in half and sew one side and the bottom seam with these dimensions)
Casings: 4"x1 1/2"
Ruffle: 8 1/2"x4" (I made it a bit bigger, since it was a bigger bag)

Next, I have to work up a phone case that closes with elastic for someone who doesn't like ruffles and drawstrings! :)

Sunday, June 19, 2011

Sunday Stash Report

I used mostly scraps this week to make little phone cases--not only did I get a new phone this week, so did several others! I'll post a little tutorial soon.

This is a smartphone-sized case for my friend. She enjoys the vampire stories that are popular lately, so she gets bat fabric!

The fabric in this week is from the clearance bin, so I think I can't really be blamed. I only went in to the shop to sign up for a landscape quilt class next month, which I'm very excited about participating in. I may have to do some more shopping to get prepared for it, unfortunately!


Used This Week: 0.125
Used Year To Date: 22.75
Added This Week: 1
Added Year To Date: 64.625
Net Used For 2011: -42.875


See how everyone else is doing!

Thursday, June 16, 2011

"City of Owls," and how Manchester Airport hates knitters

I finished the one-patch wonder quilt, now entitled "City of Owls," in time for last night's Zoo Challenge presentation. It wasn't a competitive sort of challenge like some guilds do, but I did get some "ooh"s when I showed it, and some nice feedback afterwards. Here is my fiancé holding it up:


"OK, thanks, that's great--now can you turn it right side up please?" :)


This is the first time I tried a pieced back on a quilt, and I'm pretty happy with the way it turned out. It was actually a bit small, so I really had to stretch the binding in one place, but it's meant to be a wall quilt (hence the visible hanging sleeve at the top), so I think it will be all right.


 Here is a detail of the quilting--stippling all over, and then straight lines in the cube parts.


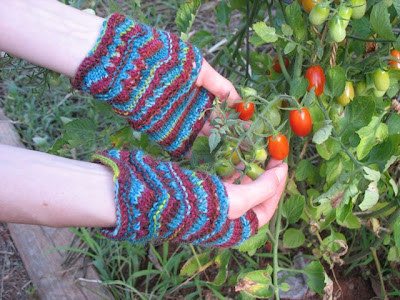
 Over the course of my recent vacation, I also finished my fingerless gloves!


The fingerless bit is really nice if you want to pick tomatoes with them in 90-degree Georgia heat! (Also, just picked, organic, homegrown tomatoes just taste so much better than what you find in the store. YUM!)


These were made using the "Rose Garden Fingerless Gloves" pattern by Anniki Leppik, from Ravelry.


I really like bringing knitting when traveling because it's a nicely portable craft, unlike quilting (at least for me, since I am too lazy to hand quilt). I also brought along materials for and started work on a little lacy shawlette. I made good progress, and was hoping to get pretty close to finishing it on the flight home, since it was going to be a 9-hour daytime flight, when Manchester Airport security struck! (Cue ominous music.)

That's right, Manchester Airport personnel insisted I put them in checked baggage, giving me a number of reasons when I kept arguing, including "US TSA regulations" (not true; I even produced a printout of this page), "British aviation regulations" (can't be true; Heathrow among others explicitly allows them), "Manchester Airport regulations" (their website does not list them as prohibited), "individual airlines" (ridiculous!), and finally "whether or not the person at the scanner feels like confiscating them" (hardly a sensible way to run airport security). I was trying to bring size 8 circular bamboo needles, by the way. Anyway, rather than risk them being confiscated and ruining my project, I put them in my checked suitcase and proceeded to be bored by hour 6 of the flight, seeing as I read very quickly and had finished my book, and having rapidly exhausted the interesting-sounding movies available.

Congratulations, Manchester Airport--you've replaced Charles de Gaulle in Paris as my most hated airport!

Sunday, June 12, 2011

Sunday Stash Report (and some fuzzy pictures...)

Tea towels don't count, right? I'm back in town after almost three weeks in England! And I have been good about buying fabric in the last few weeks. Well, except for these outrageously expensive fancy limited edition fabrics from the Victoria and Albert Museum in London.

Not my usual style but they're from the V&A!!

I was hoping to have the chance to show you lots of pictures from their famed textile collection, but alas, all the textile and all the fashion galleries--the main reason I was so excited about going there--were closed until 2013 because they were being moved elsewhere. So, if anyone is thinking about a trip to London in part to see the V&A, wait until then!!

I did take a few fuzzy pictures in the India gallery on the ground floor, which I will now subject you to. Sorry about the fuzz, but these things are old and I didn't think the museum would appreciate flash!

Embroidered, I believe.

The hemline of this Indian men's garment apparently measures something on the order of 60 meters!


An amazing painted quilt from India

Unbelievable embroidery. It looked like it was done by machine, except of course it wasn't.

A closeup of another beautiful embroidered textile. You might be able to see a little of the stitching by clicking on the picture for the full version.


Used This Week: 0
Used Year To Date: 22.625
Added This Week: 1.25
Added Year To Date: 63.625
Net Used For 2011: -42

Wednesday, June 1, 2011

Color Me Clockwise

This quilt is one of my favorite ones I've made, and my first foray into paper piecing. It was in the quilt show earlier this year, but didn't win anything.


Many of the fabrics in this quilt were leftovers from my very first quilt, which used a very similar color scheme. I thought it needed a little extra oomph to be a wallhaning, so I beaded the whole darn thing, and I have to say that I think it makes a big difference.


I like to use that picture for phone backgrounds and the like!